
Birthday Tags 'In the Hoop' Tutorial - An Easy Project!
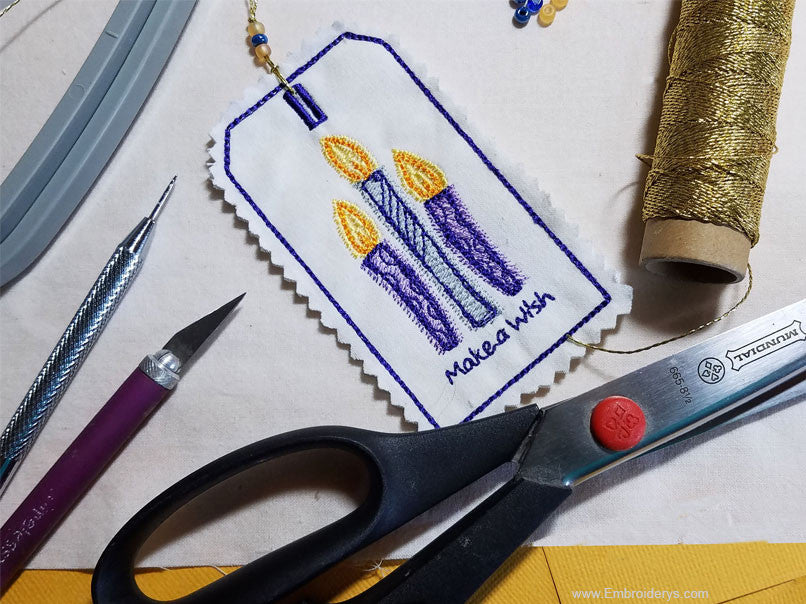
Summer is a busy time of year for us, as it seems there is always a birthday coming up. I am always looking for cute ways to personalize my gifts. And I really love gift tags. They have always been so much to fun to add to a package. And it seems like the design ideas for them are endless. These little gift tags are no exception. They are a quick in-the-hoop project that you can personalize to fit your color tastes and with three different designs, they are sure to add variety. We chose a plain muslin background as we like the simplicity of the fabric, it really lets the design of the embroidery stand out. Lets take a closer look.
Here Are The Items That You Will Need
(Video is Also Available at End of Article)...
- Birthday Tags
- Medium weight cut-away stabilizer
- Medium weight muslin - 2 pieces cut measured and cut at 3.25" x 6" (82.55 x 152.40 mm)
- 4"x4" hoop (101.60 x 101.60 mm)
- Craft knife
- Pinking shears
- Beads to match the color threads you choose
- Gold thread
- Sharp tool for poking thread through button hole
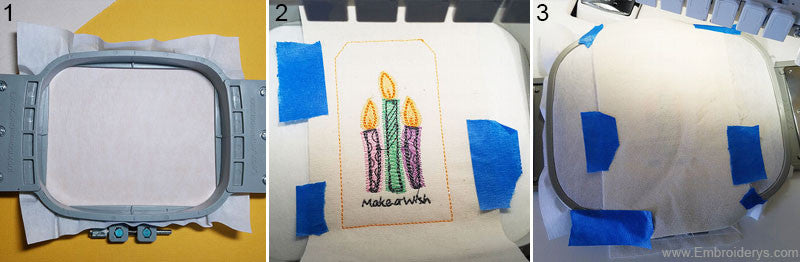
STEP 1
We started by hooping our stabilizer in the hoop. Next we stitched out the outline of the tag shape.
STEP 2
Once this step was done. We then put our our first piece of muslin onto the stitched out shape and taped into place. We then stitched out the entire design.
STEP 3
Once the design is stitched out, it will be time to add the second layer of muslin to the back of the stabilizer. Tape all edges down to keep fabric in place when putting hoop back onto arm of embroidery machine. Stitch out the rest of your pattern; in this case it is the final stitch out of the outline of the tag and the buttonhole.
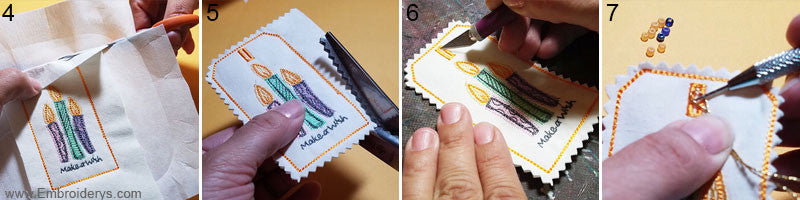
STEP 4
Trim away the excess stabilizer from the tag.
STEP 5
Using pinking shears, cut around the tag.
STEP 6
Cut the center of the button hole using your craft knife.
STEP 7
Poke gold thread through button hole. Tie off once then add desired beads and tie a knot at top of beads.
View the Video Version of This Tutorial!
Recent Posts
-

Hurricane Helene Fundraiser - Lets Help
Hurricane Helene - Lets Help Hi all, it has been a while since we have done a fundraiser and with …Oct 4th 2024 -

The Four Basic Types of Stabilizers!
The Four Basic Types of Stabilizers!Check out how they are used via our infographic below. …Sep 23rd 2024 -

Our 5 Most Popular Projects! - Tattered Stitch Embroideries
Want to view some of our most popular in-the-hoop designs? Look no further!...Placemats - https://ww …Dec 14th 2023